Open the .YML configuration file and add the following code snippet to the presentations section of the “.YML” file that you will be using for your setup. For this demonstration I have created a new “.yml” file, called “test.yml” that is located in “C:\Dia\demos\test\test.yml”.
presentations:
# Create an XMLRPC presentation instance. This presentation makes all
# device channels available for access via an XMLRPC interface. See
# the file src/presentation/xmlrpc/xmlrpc.py for more information.
- name: xmlrpc
driver: presentations.xmlrpc.xmlrpc:XMLRPC
settings:
port: 80
use_default_httpserver: True
The complete file is as follows:
Template iDigi Device Integration Application Framework Configuration File
## for the iDigi Dia Green Demonstration Kit
devices:
# Instantiate an XBee Device Manager instance.
#
# A single instance of the XBee Device Manager is required when using any
# XBee device drivers on the Dia. The XBee Device Manager is responsible
# for multiplexing data communications and managing node configurations.
#
- name: xbee_device_manager
driver: devices.xbee.xbee_device_manager.xbee_device_manager:XBeeDeviceManager
# Instantiate and XBee XBIB development board instance:
- name: xbib0
driver: devices.xbee.xbee_devices.xbee_xbib:XBeeXBIB
settings:
# Note: the xbee_device_manager setting is being set to
# "xbee_device_manager", which is the name of the instance of the
# XBeeDeviceManager, above.
xbee_device_manager: "xbee_device_manager"
# EDIT: Change the below extended_address setting to match the
# hardware address of the radio installed in your development
# board:
extended_address: "00:13:a2:00:40:30:c0:86!"
- name: sensor0
driver: devices.xbee.xbee_devices.xbee_sensor:XBeeSensor
settings:
xbee_device_manager: "xbee_device_manager"
# EDIT: Change this address to match the address of your sensor:
extended_address: "00:13:a2:00:40:55:95:ce!"
# Configure our XBee Sensor to sleep and sample every 5 seconds:
sleep: True
sample_rate_ms: 5000
# Add our Wall Router Device:
- name: wall_router0
driver: devices.xbee.xbee_devices.xbee_xbr:XBeeXBR
settings:
xbee_device_manager: "xbee_device_manager"
# EDIT: Change this address to match the address of your wall router:
extended_address: "00:13:a2:00:40:53:6e:77!"
# Configure our Wall Router to send a new sample every 5 seconds:
sample_rate_ms: 5000
presentations:
# Enable a console, reachable by connecting a telnet client to TCP port
# 4146:
- name: console0
driver: presentations.console.console:Console
settings:
type: tcp
port: 4146
# Enable a web interface available on http:///idigi_dia
- name: web0
driver: presentations.embedded_web.web:Web
settings:
page: idigi_dia
# Enable the Dia framework to answer web-service requests from ConnectWare:
- name: rci
driver: presentations.rci.rci_handler:RCIHandler
settings:
target_name: idigi_dia
# Create an XMLRPC presentation instance. This presentation makes all
# device channels available for access via an XMLRPC interface. See
# the file src/presentation/xmlrpc/xmlrpc.py for more information.
- name: xmlrpc
driver: presentations.xmlrpc.xmlrpc:XMLRPC
settings:
port: 80
use_default_httpserver: True
2. Make the files with Python
From the command line enter:
C:\Python24\Python.exe make.py demos\test\test.yml
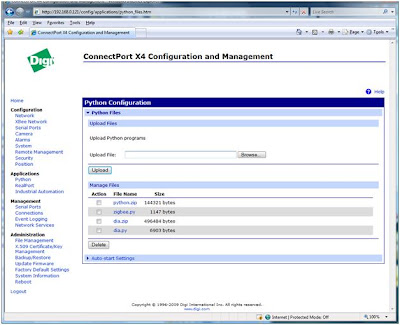
 3. Upload Files to the Gateway
Once you have received the above output, upload the the dia.zip and the dia.py files to the gateway using the web interface.
4. Use Fiddler to Invoke the XML Sensor Responses
If you don't have Fiddler, get it here. Open fiddler and click on the RequestBuilder tab. Select the POST function and enter in the IP address of the gateway followed by "/RPC2"

Enter the following into the request body and press the execute button.
<?xml version="1.0"?>
<methodCall>
<methodName>channel_list</methodName>
</methodCall>
This will return a list of all available sensors.
<?xmlversion='1.0'?>
<methodResponse>
<params>
<param>
<value><array><data>
<value><string>sensor0.temperature</string></value>
<value><string>sensor0.low_battery</string></value>
<value><string>xbib0.sw4</string></value>
<value><string>xbib0.led3</string></value>
<value><string>xbib0.led2</string></value>
<value><string>xbib0.sw1</string></value>
<value><string>xbib0.sw2</string></value>
<value><string>xbib0.led1</string></value>
<value><string>wall_router0.light</string></value>
<value><string>wall_router0.temperature</string></value>
<value><string>xbib0.sw3</string></value>
<value><string>sensor0.light</string></value>
</data></array></value>
</param>
</params>
</methodResponse>
From the list, we can select the sensor that we would like to monitor. Change the request body to include the temperature sensor as a parameter and change the method name to channel_get. Press the execute button.
You can see that we are getting the temperature sensor reading back in XML.
<?xml version="1.0"?>
<methodCall>
<methodName>channel_get</methodName>
<params>
<param>
<value><string>sensor0.temperature</string></value>
</param>
</params>
</methodCall>

Now we can go ahead an build our own application to monitor the sensors.
No comments:
Post a Comment